Imagine your backyard bathed in the warm, inviting glow of handcrafted lights, each one a tiny beacon of creativity and sustainability. Sounds idyllic, right? What if I told you that you could create this magical ambiance with just a few simple materials and a dash of DIY spirit? Let's get started!
Finding the perfect outdoor lighting can often feel like a quest. Store-bought options can be expensive and lack that personal touch, and sometimes they just don't quite capture the unique atmosphere you're aiming for. Then there's the wiring hassle, the concerns about energy consumption, and the constant need for battery replacements. It's enough to make you want to stay inside!
This guide is your answer to creating charming, eco-friendly, and budget-friendly outdoor lighting. We're diving into the world of DIY solar mason jar lights, exploring creative projects and ideas that will transform your outdoor spaces into enchanting havens. Get ready to unleash your inner artist and light up your life – sustainably!
From crafting whimsical fairy lights to creating elegant pathway illuminations, we'll explore the versatility of solar mason jar lighting. We'll cover the essential materials, step-by-step instructions, and a wealth of inspiration to get you started. So gather your mason jars, embrace your creativity, and let's embark on this illuminating DIY adventure!
The Allure of Homemade Lighting
There's just something inherently satisfying about creating something beautiful and functional with your own two hands. I remember when I first started experimenting with DIY lighting. I had a bare balcony that desperately needed some personality. Store-bought lights felt impersonal and frankly, a bit boring. That's when I stumbled upon the idea of solar mason jar lights. My first attempt was, shall we say, a learning experience. The wiring was a bit wonky, and the light wasn't as bright as I'd hoped. But the feeling of accomplishment when I finally saw that little jar glowing softly at night was incredible. It wasmylight,mycreation, and it filled my balcony with a warmth that no store-bought fixture could ever replicate.
This personal touch is a major part of the appeal. These aren't mass-produced items; they're reflections of your individual style and creativity. You can customize them with different colored jars, unique embellishments, and varying light patterns. Beyond the aesthetic appeal, there's also the satisfaction of knowing that you're using sustainable energy. Solar power is a clean, renewable resource, and by incorporating it into your lighting, you're reducing your carbon footprint and contributing to a greener planet. The combination of creativity, sustainability, and practicality makes DIY solar mason jar lighting a truly rewarding endeavor.
What Exactly are DIY Solar Mason Jar Lights?
At their core, DIY solar mason jar lights are exactly what they sound like: lighting fixtures created by repurposing mason jars and harnessing solar power. The basic principle involves using a solar-powered light kit (often found at craft stores or online) that fits snugly inside the mason jar lid. This kit typically includes a small solar panel, a rechargeable battery, and an LED light. During the day, the solar panel absorbs sunlight and charges the battery. As darkness falls, the battery powers the LED, creating a soft, ambient glow within the jar.
But the beauty of this concept lies in its endless adaptability. You can use different sizes and shapes of mason jars, experiment with various LED colors (warm white, cool white, even colored LEDs), and add decorative elements like paint, glitter, or twine to personalize your lights. You can hang them from trees, string them along fences, or simply place them on tables and patios. The possibilities are truly limitless. Beyond the basic components, you'll also need a few simple tools like a screwdriver, pliers (optional), and perhaps a drill if you want to create hanging loops or other modifications. The level of complexity is entirely up to you. You can keep it simple with a basic solar kit and a clear jar, or you can get more ambitious with intricate designs and custom modifications. It's a project that can be tailored to any skill level and any budget.
History and Myth of Mason Jars
The humble mason jar has a surprisingly rich history. It was invented in 1858 by John Landis Mason, a tinsmith from Philadelphia. His design, featuring a threaded glass jar and a metal lid with a rubber ring, revolutionized food preservation. Before mason jars, people relied on less reliable methods like salting, smoking, or pickling, which often resulted in spoilage. Mason's invention allowed families to safely and easily preserve fruits, vegetables, and jams, extending the shelf life of their harvests and reducing food waste.
The mason jar quickly became a staple in American households, and its popularity spread around the world. Over the years, its design has remained largely unchanged, a testament to its simplicity and effectiveness. But beyond its practical use, the mason jar has also taken on a symbolic significance. It represents self-sufficiency, resourcefulness, and a connection to simpler times. In recent years, the mason jar has experienced a resurgence in popularity, not just for canning, but also for a wide range of other uses, including crafting, decorating, and of course, lighting. Some even say that a well-preserved jar holds the spirit of summers past, capturing the flavors and aromas of homegrown goodness. Whether that's myth or reality, the enduring appeal of the mason jar is undeniable.
The Hidden Secret of DIY Solar Mason Jar Lights: Versatility
The real magic of DIY solar mason jar lights lies in their versatility. They're not just limited to simple outdoor lighting. With a little imagination, you can transform them into a wide array of creative projects. Consider using them as charming centerpieces for outdoor tables. Fill the jars with flowers, seashells, or other decorative elements, and let the soft glow of the LED illuminate your creations. You can also use them to create whimsical fairy gardens. Add miniature figurines, moss, and tiny plants to the jars, and watch as they come to life under the gentle light.
For a more practical application, try using them as pathway lights. Line your walkways with these glowing jars to create a safe and inviting passage. You can even customize them with stencils or paint to create unique patterns on the ground. If you're feeling ambitious, you can even incorporate them into larger lighting fixtures, such as chandeliers or sconces. The possibilities are truly endless. The key is to think outside the box and let your creativity guide you. With a little experimentation, you can transform these simple jars into stunning works of art that will add a touch of magic to any space.
Recommendations for Solar Mason Jar Projects
If you're ready to dive into the world of DIY solar mason jar lighting, here are a few recommendations to get you started. For beginners, I suggest starting with a simple project like creating basic hanging lights. All you'll need are mason jars, solar light kits, and some twine or wire. Simply attach the solar light kits to the lids, create loops for hanging, and you're good to go. Once you've mastered the basics, you can move on to more complex projects.
Consider creating a set of decorative table lamps. Fill the jars with colorful glass beads or pebbles, and add a string of fairy lights for extra sparkle. You can also experiment with different jar shapes and sizes to create a unique collection. For a truly eye-catching project, try creating a solar-powered mobile. Hang several jars from a central point, each with a different color LED and decorative element. As the wind blows, the jars will gently sway and create a mesmerizing display of light and color. Remember to choose high-quality solar light kits for optimal performance. Look for kits with long-lasting batteries and bright LEDs. And don't be afraid to experiment with different materials and techniques to create your own unique designs.
Choosing the Right Mason Jar
Selecting the right mason jar is crucial for a successful DIY solar lighting project. While any mason jar can technically work, some are better suited than others. Consider the size and shape of the jar. Smaller jars are ideal for creating delicate fairy lights, while larger jars can accommodate more elaborate decorations. Wide-mouth jars are generally easier to work with, as they provide more room for inserting the solar light kit and adding decorative elements.
The color of the jar can also affect the appearance of the light. Clear jars will produce the brightest and most natural light, while colored jars will create a softer, more ambient glow. Blue and green jars are particularly popular for creating a calming and relaxing atmosphere. If you're planning to paint or decorate the jar, make sure to use a paint that is specifically designed for glass. This will prevent the paint from chipping or peeling over time. You can also use stencils or adhesive vinyl to create intricate designs on the jar's surface. Remember to clean the jar thoroughly before starting your project to ensure that the paint or adhesive adheres properly. With a little bit of planning, you can choose the perfect mason jar to bring your DIY solar lighting vision to life.
Essential Tips and Tricks
To ensure your DIY solar mason jar lights are a shining success, here are a few essential tips and tricks. First and foremost, make sure your solar panels are getting enough sunlight. Place your lights in a location that receives at least 6-8 hours of direct sunlight per day. If you live in an area with limited sunlight, consider using a supplemental charging device to keep your batteries topped up. Regularly clean the solar panels to remove any dirt or debris that may be blocking the sunlight.
Use a soft cloth and mild soap to gently wipe down the panels. Avoid using harsh chemicals or abrasive cleaners, as these can damage the panels. If you're using rechargeable batteries, be sure to replace them every 1-2 years to maintain optimal performance. Over time, batteries can lose their ability to hold a charge, which can result in dimmer lights or shorter run times. When choosing LEDs, consider the color temperature. Warm white LEDs create a cozy and inviting atmosphere, while cool white LEDs provide a brighter and more modern look. You can also experiment with colored LEDs to create unique and festive lighting effects. Finally, don't be afraid to experiment and get creative with your designs. The possibilities are endless, so let your imagination run wild and create something truly unique.
Troubleshooting Common Issues
Even with careful planning, you may encounter a few common issues when creating your DIY solar mason jar lights. One of the most frequent problems is dim or flickering lights. This can be caused by several factors, including insufficient sunlight, low battery charge, or a faulty LED. First, try moving your lights to a sunnier location. If that doesn't solve the problem, try replacing the batteries with fresh ones. If the LED is still flickering, it may be necessary to replace the entire solar light kit.
Another common issue is water damage. If your lights are exposed to rain or moisture, water can seep into the jar and damage the solar panel or the battery. To prevent this, make sure the lid is tightly sealed. You can also add a bead of silicone sealant around the edge of the lid to create a waterproof barrier. If water does get inside the jar, immediately remove the battery and solar panel and allow them to dry completely before reassembling. If the components are severely damaged, they may need to be replaced. Finally, be aware of the potential for condensation inside the jar. This can occur when the temperature changes rapidly. To minimize condensation, try to keep the jars in a well-ventilated area. You can also add a small packet of silica gel to the jar to absorb moisture.
Fun Facts About Solar Power
Did you know that the sun provides enough energy to power the entire world for a year in just one hour? It's true! Solar power is an incredibly abundant and renewable resource. The technology to harness solar energy has been around for over a century, with the first solar cells being developed in the late 1800s. However, it wasn't until the mid-20th century that solar power became a viable source of electricity.
Today, solar power is one of the fastest-growing sources of renewable energy in the world. Solar panels are becoming more efficient and affordable, making them an increasingly attractive option for homeowners and businesses. In addition to generating electricity, solar energy can also be used for heating water, drying clothes, and even cooking food. Solar ovens are a simple and effective way to harness the sun's energy for cooking, and they are particularly useful in areas where fuel is scarce. The future of solar power is bright, with ongoing research and development aimed at improving efficiency and reducing costs. As the world transitions towards a more sustainable energy future, solar power will undoubtedly play a major role.
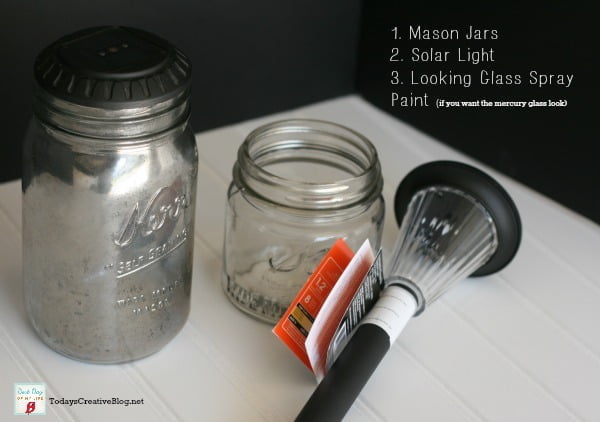
How to Make a Basic Solar Mason Jar Light
Ready to get your hands dirty? Here's a step-by-step guide on how to create a basic solar mason jar light. First, gather your materials: a mason jar, a solar light kit (available at most craft stores), and a screwdriver (optional). Start by removing the lid from the mason jar. Carefully disassemble the solar light kit. Most kits will consist of a solar panel, a rechargeable battery, and an LED light. Insert the LED light into the hole in the center of the lid. Secure it in place with the provided screws or clips.
Place the rechargeable battery inside the lid, making sure it is properly connected to the solar panel and the LED light. Snap the lid back onto the mason jar, ensuring it is securely fastened. Place the jar in a sunny location and allow the solar panel to charge the battery for at least 6-8 hours. Once the battery is fully charged, the LED light will automatically turn on at dusk. You can now hang your solar mason jar light from a tree, fence, or any other outdoor location. For added flair, try decorating the jar with paint, glitter, or ribbon. The possibilities are endless, so let your creativity shine!
What if My Light Doesn't Work?
Sometimes, despite our best efforts, things don't go as planned. If your DIY solar mason jar light isn't working, don't despair! There are several troubleshooting steps you can take. First, double-check that the battery is fully charged. If the light is not receiving enough sunlight, the battery may not be able to hold a charge. Try moving the light to a sunnier location and allowing it to charge for a full day.
Next, inspect the wiring connections. Make sure that all of the wires are securely connected to the solar panel, the battery, and the LED light. Loose or corroded connections can prevent the light from working properly. If you find any loose connections, tighten them with a screwdriver or pliers. If the wiring is damaged or corroded, you may need to replace the solar light kit. Also, check the LED bulb. If the bulb is burned out, it will need to be replaced. You can purchase replacement LED bulbs at most hardware stores. Finally, if all else fails, try replacing the battery. Over time, rechargeable batteries can lose their ability to hold a charge. Replacing the battery with a new one may be all that's needed to get your light working again.
Creative DIY Solar Mason Jar Light Ideas (Listicle)
Let's spark your imagination with a list of creative DIY solar mason jar light ideas:
- Fairy Lights: Fill the jars with miniature fairy lights for a magical glow.
- Etched Designs: Etch intricate patterns onto the jars for a unique look.
- Color-Changing LEDs: Use color-changing LEDs to create a vibrant display.
- Seashell Decor: Fill the jars with seashells for a beach-themed ambiance.
- Painted Jars: Paint the jars with colorful designs or patterns.
- Hanging Lanterns: Hang the jars from trees or fences for outdoor lighting.
- Table Centerpieces: Use the jars as decorative centerpieces for outdoor tables.
- Pathway Lights: Line your walkways with the jars for safe and inviting passage.
- Solar Mobile: Create a solar-powered mobile with multiple jars and LEDs.
- Mason Jar Chandelier: Combine several jars to create a stunning chandelier.
Question and Answer Section
Q: How long do solar mason jar lights last?
A: The lifespan of your solar mason jar lights depends on the quality of the components and the amount of sunlight they receive. Generally, you can expect them to last for several years with proper care. The batteries may need to be replaced every 1-2 years.
Q: Can I use any type of mason jar?
A: Yes, you can use any type of mason jar, but wide-mouth jars are generally easier to work with. Clear jars will produce the brightest light, while colored jars will create a softer glow.
Q: Do I need special tools to make these lights?
A: No, you don't need special tools. A screwdriver is helpful for securing the solar light kit to the lid, but most kits come with the necessary hardware. Pliers may be useful for bending wires.
Q: How much sunlight do the lights need to work properly?
A: Solar mason jar lights need at least 6-8 hours of direct sunlight per day to charge the battery fully. If you live in an area with limited sunlight, consider using a supplemental charging device.
Conclusion of DIY Solar Mason Jar Lighting: Creative Projects and Ideas
So there you have it! A comprehensive guide to creating your own DIY solar mason jar lights. From the historical significance of the mason jar to the endless creative possibilities, we've explored the world of sustainable and enchanting lighting. Remember, the key is to let your imagination run wild and experiment with different materials and techniques. With a little bit of effort, you can transform your outdoor spaces into magical havens that are both beautiful and eco-friendly. So go ahead, grab your mason jars, and start creating!